Flutter Webview Complete Example Code – Flutter WebView widget renders web pages inside of your application. It may be used to show off your own website’s content or to embed other websites’ information, such a video from YouTube or a feed from Twitter.
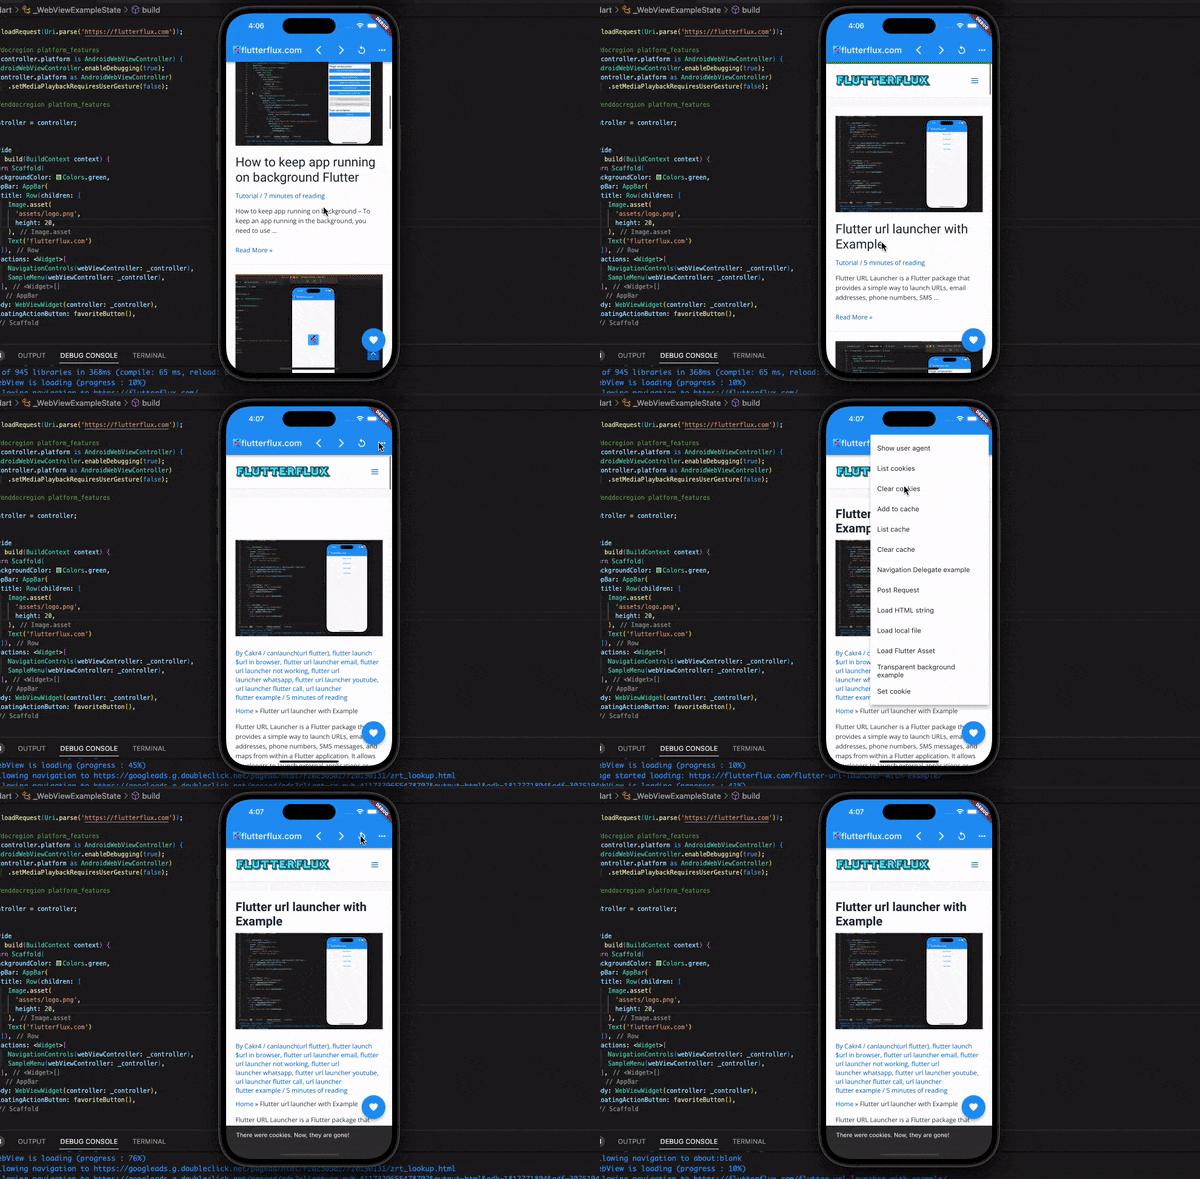
WebView widgets need the webview flutter package. Add this line to your project’s pubspec.yaml file:
dependencies:
webview_flutter: ^2.0.13
The following Dart line imports the package after adding it:
import 'package:webview_flutter/webview_flutter.dart';
You may utilize the Flutter Webview widget by creating a new instance and passing it the web page’s URL.
For example:
WebView(
  initialUrl: 'https://flutterflux.com/',
)
Among the many characteristics that may be adjusted to alter the WebView’s behavior are JavaScript support, zoom level, and reaction to navigation events. If you need additional information and examples, have a look at the webview flutter docs.
Webview loading indicator
Flutter’s WebView widget does not provide a built-in loading indicator. However, you can implement a loading indicator yourself using the WebView’s navigation delegate.
Example implementation:
- Add a state variable to track the loading state of the WebView:
bool _isLoading = true;
- Wrap your Flutter Webview widget in a Stack widget, with the loading indicator widget on top:
Stack(
  children: [
    WebView(
      initialUrl: 'https://flutterflux.com/',
      onPageStarted: (url) {
        setState(() {
          _isLoading = true;
        });
      },
      onPageFinished: (url) {
        setState(() {
          _isLoading = false;
        });
      },
      navigationDelegate: (NavigationRequest request) {
        // Handle navigation requests here if needed
        return NavigationDecision.navigate;
      },
    ),
    if (_isLoading)
      Center(
        child: CircularProgressIndicator(),
      ),
  ],
)
- A rebuild of the widget may be triggered by updating the
_isLoadingstate variable and usingsetStatein the WebView’sonPageStartedandonPageFinishedcallbacks. - Add a conditional check for _isLoading in the Stack’s children list to show or hide the loading indicator widget.
The loading indicator in the above example is a CircularProgressIndicator, but you may use whichever widget you want instead.
JavaScriptChannel WebView:
To facilitate communication between the JavaScript code in the WebView and the Dart code in your Flutter app, the Flutter Webview widget supports the addition of JavaScript channels.
These are the measures you need take to include a JavaScript channel into your WebView:
- Create a JavascriptChannel object:
final javascriptChannel = JavascriptChannel(
  name: 'myChannel',
  onMessageReceived: (JavascriptMessage message) {
    // Handle messages received from JavaScript here
    print('Received message: ${message.message}');
  },
);
we’re creating a JavaScript channel named ‘myChannel’, and defining a callback function to handle messages received from JavaScript.
- Add the JavaScript channel to your WebView’s JavascriptChannel set:
WebView(
  initialUrl: 'https://flutterflux.com/',
  javascriptChannels: [
    javascriptChannel,
  ].toSet(),
  navigationDelegate: (NavigationRequest request) {
    // Handle navigation requests here if needed
    return NavigationDecision.navigate;
  },
)
The WebView’s javascriptChannels property receives the object we established in step 1.
- In your JavaScript code running in the WebView, send a message through the channel:
window.flutter_inject('myChannel', 'Hello from JavaScript!');
Via the’myChannel’ channel, we’re saying “Hello from JavaScript!” in this example. Be aware that the webview_flutter package has a built-in function called flutter inject that may be used to communicate with your Flutter app.
- Handle the message in your Dart code:
When a message is received from JavaScript, the onMessageReceived callback function defined in step 1 is called. You can handle the message in this function.
This message may be printed to the console as an example:
onMessageReceived: (JavascriptMessage message) {
  print('Received message: ${message.message}');
},
Webview flutter offline:
Unfortunately, offline support is not a standard feature of the Flutter Webview widget. Nevertheless, with some clever caching and network status checking, you can give your Flutter app the ability to function without an internet connection.
Example implementation:
- Add the
flutter_cache_managerpackage to your project by adding the following line to your project’s pubspec.yaml file:
dependencies:
  flutter_cache_manager: ^2.2.2
- Import the package in your Dart code using the following line:
import 'package:flutter_cache_manager/flutter_cache_manager.dart';
- Use the CacheManager class to download and cache the web content:
final cacheManager = CacheManager(
  Config(
    'myCacheKey',
    stalePeriod: Duration(days: 30),
    maxNrOfCacheObjects: 100,
  ),
);

final cachedUrl = await cacheManager.getSingleFile('https://www.example.com');
Using myCacheKey as the cache key and setting the stale time to 30 days, the following code creates a CacheManager object. We are also capping the cache size at 100 items. At the end, we’ll use the getSingleFile technique to get and save the web data at the specified URL.
- Check for network connectivity before loading the web content:
final connectivityResult = await Connectivity().checkConnectivity();

if (connectivityResult == ConnectivityResult.none) {
  // Load cached content if no network connectivity
  final file = await cacheManager.getSingleFile('https://flutterflux.com');
  final htmlContent = await file.readAsString();
  webViewController.loadUrl(Uri.dataFromString(htmlContent, mimeType: 'text/html').toString());
} else {
  // Load fresh content if network is available
  webViewController.loadUrl('https://flutterflux.com');
}
The Connectivity plugin is used here to verify an active network connection. We load the stored data instead of the new data if the network connection is down. In any case, we’re currently updating to the latest materials.
- Handle navigation events to check for network connectivity and update the cached content as needed:
WebView(
  initialUrl: 'https://flutterflux.com',
  navigationDelegate: (NavigationRequest request) async {
    final connectivityResult = await Connectivity().checkConnectivity();

    if (connectivityResult != ConnectivityResult.none) {
      // Update cached content if network is available
      await cacheManager.removeFile(request.url);
      await cacheManager.getSingleFile(request.url);
    }

    return NavigationDecision.navigate;
  },
)
To manage navigation-related events, we’re making use of the navigationDelegate here. We are monitoring network availability and refreshing cached pages when new material is requested.
By using caching and performing network connection checks, the WebView in your Flutter app may function properly even when the user is in an unconnected area. Have in mind, too, that caching isn’t a panacea and could not apply to all online material. As an added complication, certain websites may only work correctly when linked to the internet.
Conclusion
Flutter WebView widget displays web pages in your app. You may include YouTube videos or Twitter feeds or show your own online content.
The Flutter WebView widget may be customized by specifying characteristics like JavaScript, zoom level, and navigation events. JavaScript channels enable Flutter Webview JavaScript code to communicate with Flutter app Dart code.
Flutter Webview navigation delegate lets you add a loading indication.
The WebView widget makes it easy to incorporate online material into your Flutter project, making it useful for cross-platform apps that use native and web technologies. read too How to add SVG image in Flutter

