Bottom NavigationBar in Flutter – Tabs on the BottomNavigationBar reflect app screens or routes. The active tab is highlighted, and tapping any tab switches screens.
Customize the navigation bar with the BottomNavigationBar widget. bottom navigation bar flutter example background, and font can be customized. The navigation bar’s animation when switching tabs can also be customized.
Bottom NavigationBar in Flutter Example
import 'package:flutter/material.dart';

void main() {
  runApp(MyApp());
}

class MyApp extends StatefulWidget {
  @override
  _MyAppState createState() => _MyAppState();
}

class _MyAppState extends State<MyApp> {
  int _currentIndex = 0;

  final List<Widget> _children = [
    ScreenOne(),
    ScreenTwo(),
    ScreenThree(),
    ScreenFour(),
    ScreenFive()
  ];

  void onTabTapped(int index) {
    setState(() {
      _currentIndex = index;
    });
  }

  @override
  Widget build(BuildContext context) {
    return MaterialApp(
      home: Scaffold(
        body: _children[_currentIndex],
        bottomNavigationBar: BottomNavigationBar(
          onTap: onTabTapped,
          currentIndex: _currentIndex,
          items: [
            BottomNavigationBarItem(
              icon: Icon(Icons.home),
              label: 'home',
            ),
            BottomNavigationBarItem(
              icon: Icon(Icons.search),
              label: 'search',
            ),
            BottomNavigationBarItem(
              icon: Icon(Icons.notifications),
              label: 'notifications',
              backgroundColor: Colors.deepPurple,
            ),
            BottomNavigationBarItem(
              icon: Icon(Icons.mail),
              label: 'mail',
            ),
            BottomNavigationBarItem(
              icon: Icon(Icons.settings),
              label: 'settings',
            ),
          ],
        ),
      ),
    );
  }
}

class ScreenOne extends StatelessWidget {
  @override
  Widget build(BuildContext context) {
    return Center(
      child: Text('Screen One'),
    );
  }
}

class ScreenTwo extends StatelessWidget {
  @override
  Widget build(BuildContext context) {
    return Center(
      child: Text('Screen Two'),
    );
  }
}

class ScreenThree extends StatelessWidget {
  @override
  Widget build(BuildContext context) {
    return Center(
      child: Text('Screen Three'),
    );
  }
}

class ScreenFour extends StatelessWidget {
  @override
  Widget build(BuildContext context) {
    return Center(
      child: Text('Screen Four'),
    );
  }
}

class ScreenFive extends StatelessWidget {
  @override
  Widget build(BuildContext context) {
    return Center(
      child: Text('Screen Five'),
    );
  }
}
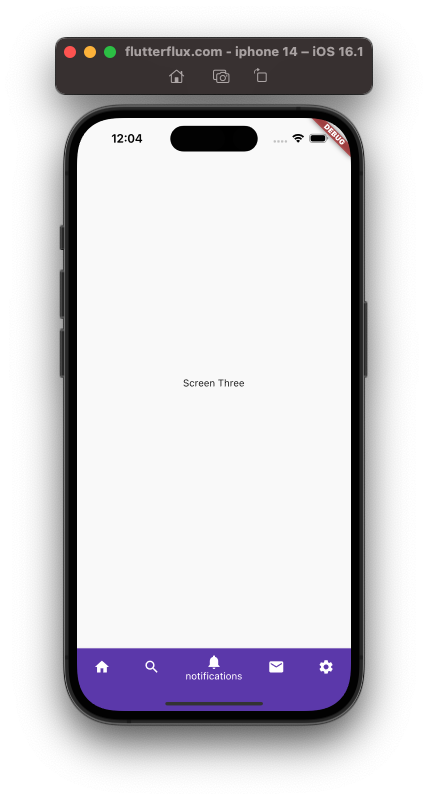
This example creates a StatefulWidget named MyApp with a _currentIndex variable that tracks the active tab index. We also define a list of child widgets for each tab and a onTabTapped function that updates the _currentIndex variable.
MyApp’s build method returns a MaterialApp with a Scaffold home widget. BottomNavigationBar widgets define each tab in the Scaffold. The BottomNavigationBar receives _currentIndex and onTabTapped.
Output
Floating Action Button in Bottom Navigation Bar Flutter
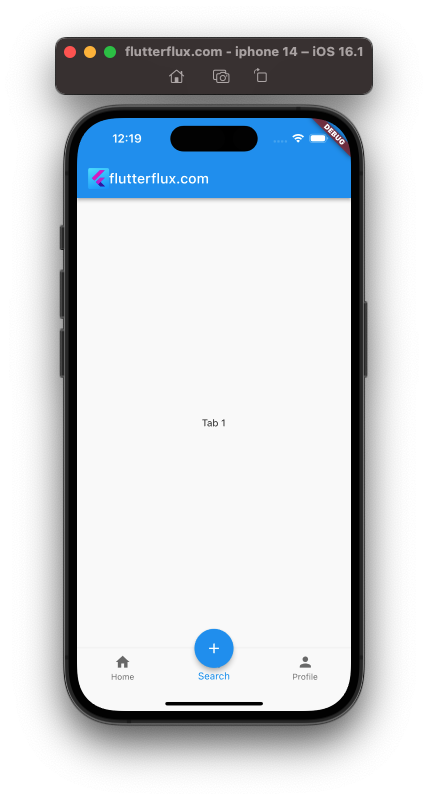
Use the Scaffold widget to wrap your BottomNavigationBar and FloatingActionButton widgets to add an FAB to a Bottom Navigation Bar in Flutter.
Flutter Bottom Navigation Bar FAB example is:
import 'package:flutter/material.dart';

void main() => runApp(MyApp());

class MyApp extends StatelessWidget {
  @override
  Widget build(BuildContext context) {
    return MaterialApp(
      title: 'Flutter Bottom Navigation Bar with FAB',
      home: MyHomePage(),
    );
  }
}

class MyHomePage extends StatefulWidget {
  @override
  _MyHomePageState createState() => _MyHomePageState();
}

class _MyHomePageState extends State<MyHomePage> {
  int _currentIndex = 0;

  void _onTabTapped(int index) {
    setState(() {
      _currentIndex = index;
    });
  }

  @override
  Widget build(BuildContext context) {
    return Scaffold(
      appBar: AppBar(
        title: Row(children: [
          Image.asset(
            'assets/logo.png',
            height: 30,
          ),
          Text('flutterflux.com')
        ]),
      ),
      body: Center(
        child: Text('Tab $_currentIndex'),
      ),
      bottomNavigationBar: BottomNavigationBar(
        currentIndex: _currentIndex,
        onTap: _onTabTapped,
        items: [
          BottomNavigationBarItem(
            icon: Icon(Icons.home),
            label: 'Home',
          ),
          BottomNavigationBarItem(
            icon: Icon(Icons.search),
            label: 'Search',
          ),
          BottomNavigationBarItem(
            icon: Icon(Icons.person),
            label: 'Profile',
          ),
        ],
      ),
      floatingActionButton: FloatingActionButton(
        onPressed: () {
          // Add your FAB action here
        },
        child: Icon(Icons.add),
      ),
      floatingActionButtonLocation: FloatingActionButtonLocation.centerDocked,
    );
  }
}
The Scaffold widget defines the BottomNavigationBar and FloatingActionButton widget. The FloatingActionButton widget and its location relative to the Bottom Navigation Bar are specified by the floatingActionButtonLocation property. This FloatingActionButton is centered and docked to the bottom.
Output
Cupertino Bottom Navigation Bar Flutter
Using the CupertinoTabScaffold widget and the CupertinoTabBar widget, you can make a bottom navigation bar in Flutter that mimics Apple’s iOS design.
A sample of some code would look like this:
import 'package:flutter/cupertino.dart';
import 'package:flutter/material.dart';

void main() {
  runApp(MyApp());
}

class MyApp extends StatelessWidget {
  @override
  Widget build(BuildContext context) {
    return CupertinoApp(
      home: CupertinoTabScaffold(
        tabBar: CupertinoTabBar(
          items: [
            BottomNavigationBarItem(
              icon: Icon(CupertinoIcons.home),
              label: 'Home',
            ),
            BottomNavigationBarItem(
              icon: Icon(CupertinoIcons.search),
              label: 'Search',
            ),
            BottomNavigationBarItem(
              icon: Icon(CupertinoIcons.settings),
              label: 'Settings',
            ),
          ],
        ),
        tabBuilder: (context, index) {
          return Center(
            child: Text('Page $index'),
          );
        },
      ),
    );
  }
}
The bottom bottom navigation bar primary widget is a CupertinoTabScaffold. CupertinoTabBar widgets are used for the tabBar property, and each tab’s icons and labels are specified by a collection of BottomNavigationBarItem widget.
Output
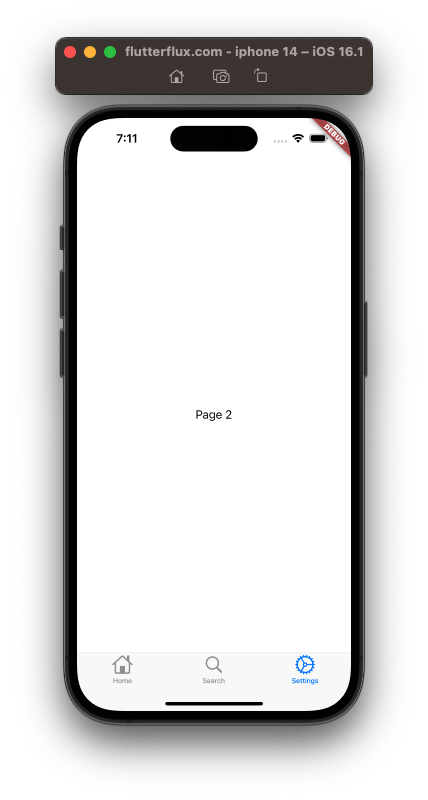
The tabBuilder property is a callback that should return the tab content. Adjusting the backgroundColor and activeColor of the CupertinoTabBar widget will allow you to further personalize the look of the bottom navigation bar.
Animated Custom Bottom Navigation Bar Flutter
Some sample code is as follows:
import 'package:flutter/material.dart';

class AnimatedBottomNavBar extends StatefulWidget {
  @override
  _AnimatedBottomNavBarState createState() => _AnimatedBottomNavBarState();
}

class _AnimatedBottomNavBarState extends State<AnimatedBottomNavBar> {
  int _selectedIndex = 0;

  static const List<Widget> _pages = <Widget>[
    Text('Home'),
    Text('Search'),
    Text('Profile'),
  ];

  @override
  Widget build(BuildContext context) {
    return Scaffold(
      body: Center(
        child: _pages.elementAt(_selectedIndex),
      ),
      bottomNavigationBar: AnimatedBottomNavigationBar(
        currentIndex: _selectedIndex,
        onTap: (index) {
          setState(() {
            _selectedIndex = index;
          });
        },
      ),
    );
  }
}

class AnimatedBottomNavigationBar extends StatefulWidget {
  final int currentIndex;
  final Function(int) onTap;

  AnimatedBottomNavigationBar({this.currentIndex, this.onTap});

  @override
  _AnimatedBottomNavigationBarState createState() =>
      _AnimatedBottomNavigationBarState();
}

class _AnimatedBottomNavigationBarState
    extends State<AnimatedBottomNavigationBar>
    with SingleTickerProviderStateMixin {
  AnimationController _animationController;
  Animation<double> _animation;

  @override
  void initState() {
    super.initState();

    _animationController =
        AnimationController(vsync: this, duration: Duration(milliseconds: 200));
    _animation =
        CurvedAnimation(parent: _animationController, curve: Curves.easeInOut);

    _animationController.forward();
  }

  @override
  void dispose() {
    _animationController.dispose();
    super.dispose();
  }

  @override
  Widget build(BuildContext context) {
    return Container(
      decoration: BoxDecoration(
        color: Colors.white,
        boxShadow: [
          BoxShadow(
            color: Colors.black12,
            blurRadius: 2.0,
          )
        ],
      ),
      child: Row(
        mainAxisAlignment: MainAxisAlignment.spaceAround,
        children: <Widget>[
          _buildNavItem(Icons.home, 0),
          _buildNavItem(Icons.search, 1),
          _buildNavItem(Icons.person, 2),
        ],
      ),
    );
  }

  Widget _buildNavItem(IconData icon, int index) {
    bool isSelected = widget.currentIndex == index;

    return GestureDetector(
      onTap: () {
        widget.onTap(index);
        _animationController.reset();
        _animationController.forward();
      },
      child: Container(
        height: 60.0,
        width: 60.0,
        decoration: BoxDecoration(
          color: isSelected ? Colors.blue : Colors.transparent,
          borderRadius: BorderRadius.circular(30.0),
        ),
        child: ScaleTransition(
          scale: _animation,
          child: Icon(
            icon,
            color: isSelected ? Colors.white : Colors.black,
          ),
        ),
      ),
    );
  }
}
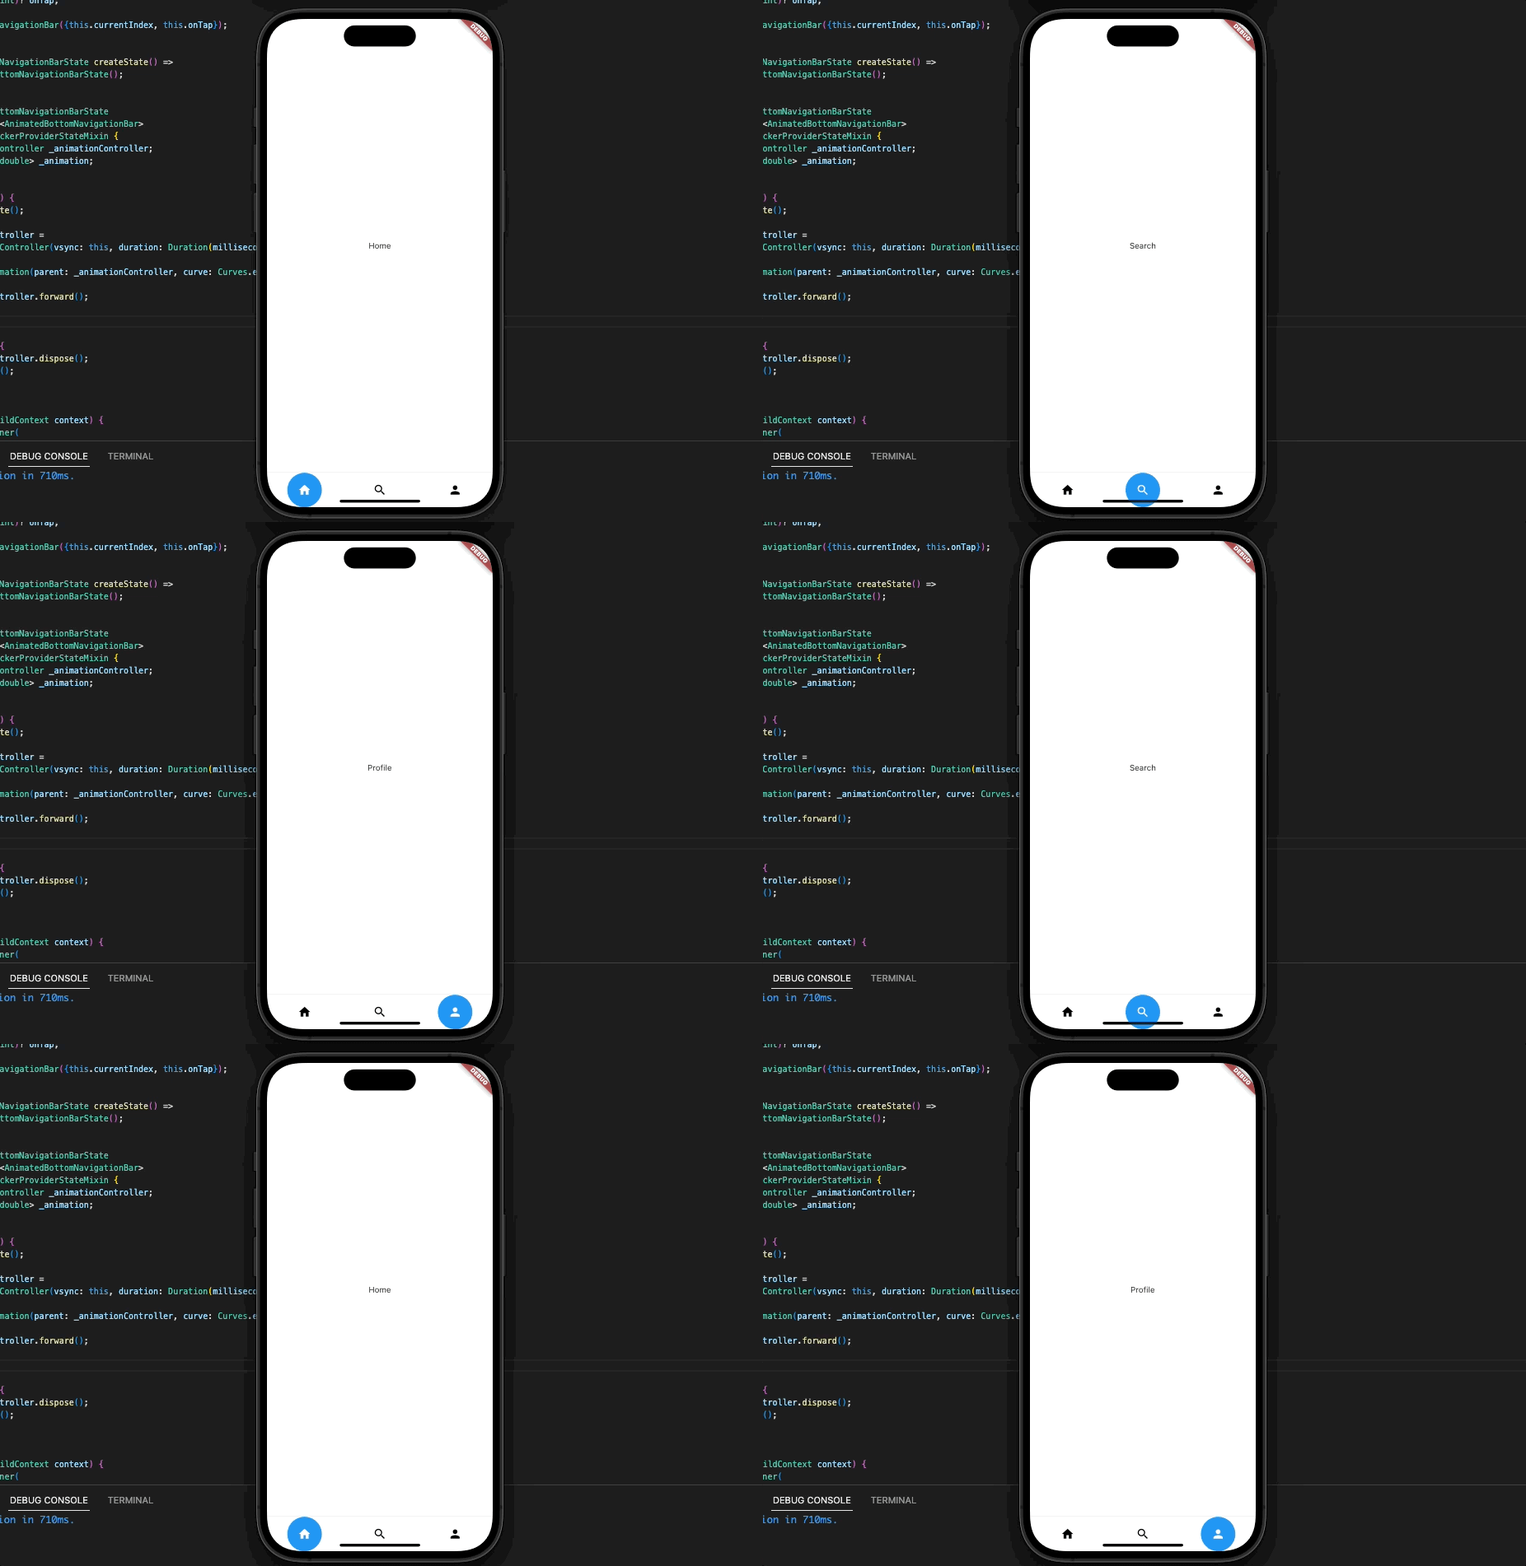
AnimatedBottomNavigationBar surrounds BottomNavigationBar in this example. The AnimatedBottomNavigationBar widget scales the selected icon using AnimationController and CurvedAnimation classes. We reset the animation controller and replay the animation when the user taps an icon.
Just add the AnimatedBottomNavBar widget to your widget:
class MyApp extends StatelessWidget {
  @override
  Widget build(BuildContext context) {
    return MaterialApp(
      title: 'Animated Bottom Navigation Bar',
      home: AnimatedBottomNavBar(),
    );
  }
}
Output
Hide dynamic bottom navigation bar flutter
On scroll, the ScrollController and AnimatedContainer widgets hide the Flutter Bottom Navigation Bar.
Initiate the scrolling process by creating a ScrollController and affixing it to the widget containing the content to be scrolled:
ScrollController _scrollController = ScrollController();
Make a boolean variable to keep tabs on whether the navigation bar is visible or not:
Make a boolean variable to keep tabs on whether the menu bar is visible or not:
The next step is to enclose the bottom navigation bar within an AnimatedContainer widget, which will animate the bar’s height when it is collapsed or expanded:
AnimatedContainer(
  duration: Duration(milliseconds: 500),
  height: _isVisible ? kBottomNavigationBarHeight : 0.0,
  child: BottomNavigationBar(
    // ...
  ),
),
Finally, respond to scroll events from the ScrollController by adjusting the visibility of the navigation bar.
_scrollController.addListener(() {
  if (_scrollController.position.userScrollDirection ==
      ScrollDirection.reverse) {
    if (_isVisible) {
      setState(() {
        _isVisible = false;
      });
    }
  }
  if (_scrollController.position.userScrollDirection ==
      ScrollDirection.forward) {
    if (!_isVisible) {
      setState(() {
        _isVisible = true;
      });
    }
  }
});
This code will hide the bottom navigation bar as the user scrolls down and reveal it as they scroll up. In order to make the transition appear seamless, the AnimatedContainer widget will animate the height change.
Full code:
import 'package:flutter/material.dart';
import 'package:flutter/rendering.dart';

void main() {
  runApp(MyApp());
}

class MyApp extends StatelessWidget {
  @override
  Widget build(BuildContext context) {
    return MaterialApp(
      title: 'Flutter Hide Bottom Navigation Bar on Scroll',
      theme: ThemeData(
        primarySwatch: Colors.blue,
      ),
      home: HomePage(),
    );
  }
}

class HomePage extends StatefulWidget {
  @override
  _HomePageState createState() => _HomePageState();
}

class _HomePageState extends State<HomePage> {
  ScrollController _scrollController = ScrollController();
  bool _isVisible = true;

  @override
  void initState() {
    super.initState();
    _scrollController.addListener(() {
      if (_scrollController.position.userScrollDirection ==
          ScrollDirection.reverse) {
        if (_isVisible) {
          setState(() {
            _isVisible = false;
          });
        }
      }
      if (_scrollController.position.userScrollDirection ==
          ScrollDirection.forward) {
        if (!_isVisible) {
          setState(() {
            _isVisible = true;
          });
        }
      }
    });
  }

  @override
  void dispose() {
    _scrollController.dispose();
    super.dispose();
  }

  @override
  Widget build(BuildContext context) {
    return Scaffold(
      appBar: AppBar(
        title: Row(children: [
          Image.asset(
            'assets/logo.png',
            height: 30,
          ),
          Text('flutterflux.com')
        ]),
      ),
      body: ListView.builder(
        controller: _scrollController,
        itemCount: 150,
        itemBuilder: (context, index) {
          return ListTile(
            title: Text('Item $index'),
          );
        },
      ),
      bottomNavigationBar: AnimatedContainer(
        duration: Duration(milliseconds: 10),
        height: _isVisible ? 90 : 0.0,
        child: BottomNavigationBar(
          showSelectedLabels: false,
          showUnselectedLabels: false,
          items: [
            BottomNavigationBarItem(
              icon: Icon(Icons.home),
              label: 'Home',
            ),
            BottomNavigationBarItem(
              icon: Icon(Icons.search),
              label: 'Search',
            ),
            BottomNavigationBarItem(
              icon: Icon(Icons.settings),
              label: 'Settings',
            ),
          ],
        ),
      ),
    );
  }
}
Output
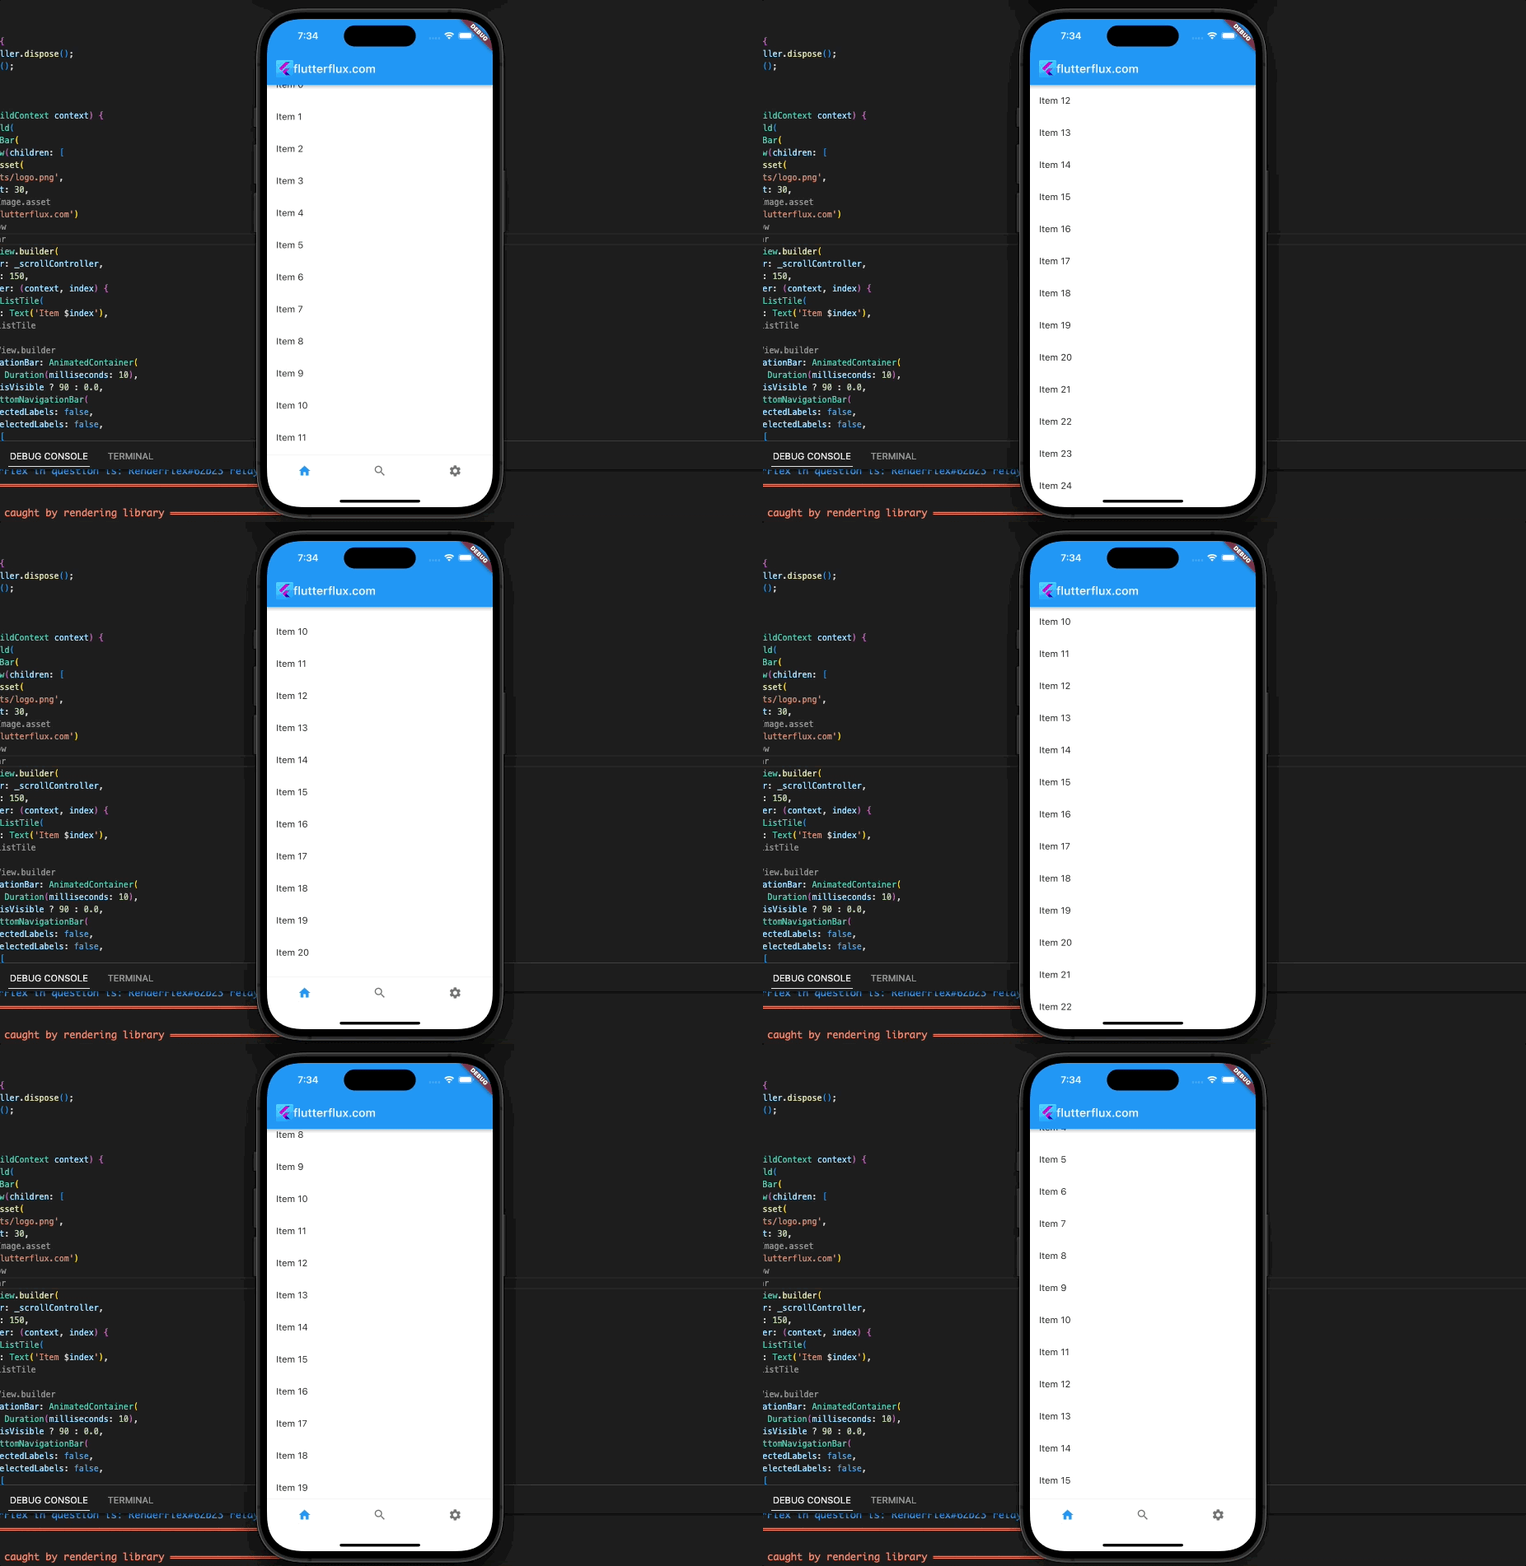
We do this by constructing a ScrollController and adding 150 items to a ListView.builder. We keep an eye on controller scroll events and refresh the status of the bottom menu accordingly. The AnimatedContainer widget makes the rise and fall of the menu bar appear seamless.
Conclusion
Developers can design straightforward and user-friendly navigation experiences for their apps with Flutter bottom navigation bar. It lets users seamlessly move between app panels and functions with its customisable design and built-in animations. Flutter’s bottom navigation bar may be readily combined with other widgets and features, making it a flexible tool for designing sophisticated and dynamic apps. The bottom navigation bar is vital to every Flutter app, and knowing its use can improve the user experience and app functioning. read too How to Make TabBar in Flutter


