How to Make tabBar in Flutter – TabBar in Flutter will include a number of tabs that the user can use to navigate between various windows or information feeds.
Here are the fundamental stages for Make TabBar in Flutter:
- To control how the TabBar in Flutter behaves, create a new object of type
TabController. You may make one in theStateclass of your widget.
class _MyFlutterFluxState extends State with SingleTickerProviderStateMixin {
  TabController _tabController;

  @override
  void initState() {
    super.initState();
    _tabController = TabController(length: 3, vsync: this);
  }

  @override
  void dispose() {
    _tabController.dispose();
    super.dispose();
  }

  // ...
}
Next, we create a TabController object with a length of 3 tabs, and use the SingleTickerProviderStateMixin to provide the vsync parameter.
- Create a
TabBarwidget and pass theTabControlleras itscontrollerparameter.
TabBar(
  controller: _tabController,
  tabs: [
    Tab(text: 'Tab 1'),
    Tab(text: 'Tab 2'),
    Tab(text: 'Tab 3'),
  ],
),
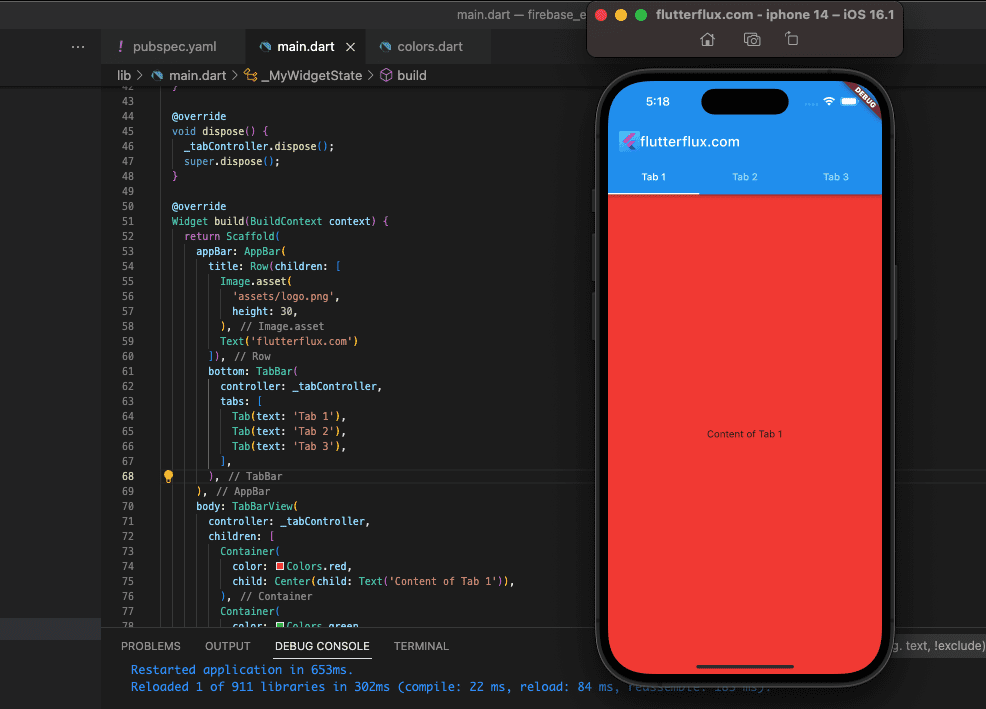
To continue, let’s make a TabBar in Flutter widget with three Tab widgets. The tab’s text is displayed using the Tab widget’s text parameter.
- To show the information for each tab, make a
TabBarViewwidget.TabBarViewutilizes the sameTabControllerobject asTabBarto maintain consistency between tabs and content.
TabBarView(
  controller: _tabController,
  children: [
    Container(
      color: Colors.red,
      child: Center(child: Text('Content of Tab 1')),
    ),
    Container(
      color: Colors.green,
      child: Center(child: Text('Content of Tab 2')),
    ),
    Container(
      color: Colors.blue,
      child: Center(child: Text('Content of Tab 3')),
    ),
  ],
),
After that, we construct a TabBarView widget with three Container widgets serving as the bars’ individual contents. The color property of the Container widget determines the overall tone of the page’s background.
- Your final code should resemble this example:
import 'dart:async';
import 'package:flutter/material.dart';

Future main() async {
  WidgetsFlutterBinding.ensureInitialized();

  runApp(MyApp());
}

class MyApp extends StatelessWidget {
  @override
  Widget build(BuildContext context) {
    return MaterialApp(title: 'flutterflux.com', home: MyFlutterFlux());
  }
}

class MyFlutterFlux extends StatefulWidget {
  @override
  _MyFlutterFluxState createState() => _MyFlutterFluxState();
}

class _MyFlutterFluxState extends State
    with SingleTickerProviderStateMixin {
  late TabController _tabController;

  @override
  void initState() {
    super.initState();
    _tabController = TabController(length: 3, vsync: this);
  }

  @override
  void dispose() {
    _tabController.dispose();
    super.dispose();
  }

  @override
  Widget build(BuildContext context) {
    return Scaffold(
      appBar: AppBar(
        title: Row(children: [
          Image.asset(
            'assets/logo.png',
            height: 30,
          ),
          Text('flutterflux.com')
        ]),
        bottom: TabBar(
          controller: _tabController,
          tabs: [
            Tab(text: 'Tab 1'),
            Tab(text: 'Tab 2'),
            Tab(text: 'Tab 3'),
          ],
        ),
      ),
      body: TabBarView(
        controller: _tabController,
        children: [
          Container(
            color: Colors.red,
            child: Center(child: Text('Content of Tab 1')),
          ),
          Container(
            color: Colors.green,
            child: Center(child: Text('Content of Tab 2')),
          ),
          Container(
            color: Colors.blue,
            child: Center(child: Text('Content of Tab 3')),
          ),
        ],
      ),
    );
  }
}
Please note that the material.dart package must be loaded in order to use the Scaffold, AppBar, TabBar, or TabBarView components. This is only an example; the TabBar in Flutter can be customized in appearance and functionality to meet your specific requirements.
Custom TabBar in Flutter indicator
The TabBar widget and a TabController allow you to create a unique TabBar. The TabController monitors window states and allows for window change via code.
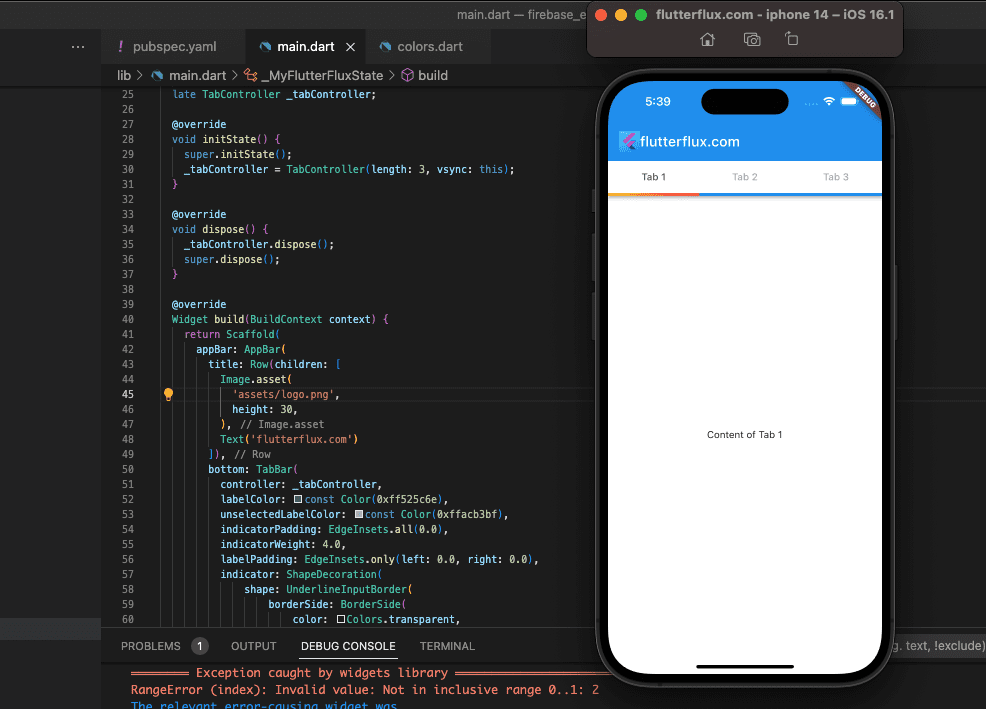
Example of how to create a custom TabBar in Flutter with gradient Indicator:
import 'dart:async';
import 'package:flutter/material.dart';

Future main() async {
  WidgetsFlutterBinding.ensureInitialized();

  runApp(MyApp());
}

class MyApp extends StatelessWidget {
  @override
  Widget build(BuildContext context) {
    return MaterialApp(title: 'flutterflux.com', home: MyFlutterFlux());
  }
}

class MyFlutterFlux extends StatefulWidget {
  @override
  _MyFlutterFluxState createState() => _MyFlutterFluxState();
}

class _MyFlutterFluxState extends State
    with SingleTickerProviderStateMixin {
  late TabController _tabController;

  @override
  void initState() {
    super.initState();
    _tabController = TabController(length: 3, vsync: this);
  }

  @override
  void dispose() {
    _tabController.dispose();
    super.dispose();
  }

  @override
  Widget build(BuildContext context) {
    return Scaffold(
      appBar: AppBar(
        title: Row(children: [
          Image.asset(
            'assets/logo.png',
            height: 30,
          ),
          Text('flutterflux.com')
        ]),
        bottom: TabBar(
          controller: _tabController,
          labelColor: const Color(0xff525c6e),
          unselectedLabelColor: const Color(0xffacb3bf),
          indicatorPadding: EdgeInsets.all(0.0),
          indicatorWeight: 4.0,
          labelPadding: EdgeInsets.only(left: 0.0, right: 0.0),
          indicator: ShapeDecoration(
              shape: UnderlineInputBorder(
                  borderSide: BorderSide(
                      color: Colors.transparent,
                      width: 0,
                      style: BorderStyle.solid)),
              gradient: LinearGradient(colors: [Colors.amber, Colors.red])),
          tabs: [
            Container(
                alignment: Alignment.center,
                color: Colors.white,
                child: Tab(text: 'Tab 1')),
            Container(
                alignment: Alignment.center,
                color: Colors.white,
                child: Tab(text: 'Tab 2')),
            Container(
                alignment: Alignment.center,
                color: Colors.white,
                child: Tab(text: 'Tab 3')),
          ],
        ),
      ),
      body: TabBarView(
        controller: _tabController,
        children: [
          Container(
            color: Colors.white,
            child: Center(child: Text('Content of Tab 1')),
          ),
          Container(
            color: Colors.green,
            child: Center(child: Text('Content of Tab 2')),
          ),
          Container(
            color: Colors.blue,
            child: Center(child: Text('Content of Tab 3')),
          ),
        ],
      ),
    );
  }
}

class CustomUnderlineTabIndicator extends Decoration {
  /// Create an underline style selected tab indicator.
  ///
  /// The [borderSide] and [insets] arguments must not be null.
  const CustomUnderlineTabIndicator({
    this.gradient,
    this.insets = EdgeInsets.zero,
    this.borderSide = const BorderSide(width: 2.0, color: Colors.white),
  });

  /// The color and weight of the horizontal line drawn below the selected tab.
  final BorderSide borderSide;

  final Gradient? gradient;

  /// Locates the selected tab's underline relative to the tab's boundary.
  ///
  /// The [TabBar.indicatorSize] property can be used to define the tab
  /// indicator's bounds in terms of its (centered) tab widget with
  /// [TabBarIndicatorSize.label], or the entire tab with
  /// [TabBarIndicatorSize.tab].
  final EdgeInsetsGeometry insets;

  @override
  Decoration? lerpFrom(Decoration? a, double t) {
    if (a is CustomUnderlineTabIndicator) {
      return CustomUnderlineTabIndicator(
        gradient: Gradient.lerp(a.gradient, gradient, t),
        borderSide: BorderSide.lerp(a.borderSide, borderSide, t),
        insets: EdgeInsetsGeometry.lerp(a.insets, insets, t)!,
      );
    }
    return super.lerpFrom(a, t);
  }

  @override
  Decoration? lerpTo(Decoration? b, double t) {
    if (b is CustomUnderlineTabIndicator) {
      return CustomUnderlineTabIndicator(
        gradient: Gradient.lerp(gradient, b.gradient, t),
        borderSide: BorderSide.lerp(borderSide, b.borderSide, t),
        insets: EdgeInsetsGeometry.lerp(insets, b.insets, t)!,
      );
    }
    return super.lerpTo(b, t);
  }

  @override
  BoxPainter createBoxPainter([VoidCallback? onChanged]) {
    return _CustomUnderlinePainter(this, onChanged);
  }

  Rect _indicatorRectFor(Rect rect, TextDirection textDirection) {
    final Rect indicator = insets.resolve(textDirection).deflateRect(rect);
    return Rect.fromLTWH(
      indicator.left,
      indicator.bottom - borderSide.width,
      indicator.width,
      borderSide.width,
    );
  }

  @override
  Path getClipPath(Rect rect, TextDirection textDirection) {
    return Path()..addRect(_indicatorRectFor(rect, textDirection));
  }
}

class _CustomUnderlinePainter extends BoxPainter {
  _CustomUnderlinePainter(this.decoration, VoidCallback? onChanged)
      : super(onChanged);

  final CustomUnderlineTabIndicator decoration;

  @override
  void paint(Canvas canvas, Offset offset, ImageConfiguration configuration) {
    assert(configuration.size != null);
    final Rect rect = offset & configuration.size!;
    final TextDirection textDirection = configuration.textDirection!;
    final Rect indicator = decoration
        ._indicatorRectFor(rect, textDirection)
        .deflate(decoration.borderSide.width / 2.0);
    final Paint paint = decoration.borderSide.toPaint()
      ..strokeCap = StrokeCap.square;
    paint.shader =
        decoration.gradient?.createShader(rect, textDirection: textDirection);
    canvas.drawLine(indicator.bottomLeft, indicator.bottomRight, paint);
  }
}
Conclusion
The TabBar in Flutter is a great way to organize content within an app by presenting several tabs that users can navigate between. It is easy to implement and adapt to fit different needs. In cases where you need to display many categories of material, multiple views of the same data, or multiple actions within your app, the TabBar in Flutter widget can help you achieve a clean and intuitive user interface. read too Dark and Light Mode in flutter

