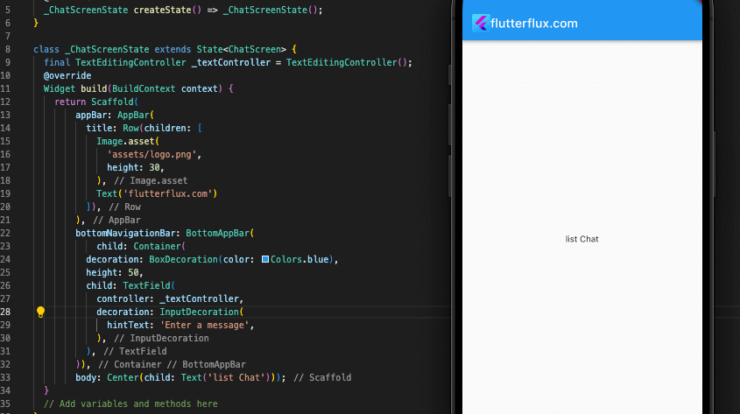
Flutter Chat app with Realtime Firebase Database – Flutter is a popular mobile app framework build cross platform. Firebase, a real-time NoSQL database, integrates with Flutter easily. Flutter may be used to make a real-time Firebase chat app.
I can demonstrate how to build a Flutter chat app with Firebase Realtime Database. Steps:
- Set up Firebase: Start a new Firebase project and add Flutter dependencies. This phase is documented by Firebase.
- Create a chat screen:Build a messaging screen for users. ListView, TextField, and RaisedButton are Flutter widgets for UI creation.
- Store messages in Firebase: Save user messages in Firebase Realtime Database. Create a Firebase database reference and use push() to add messages.
- Retrieve messages from Firebase: Firebase Realtime Database’s onChildAdded() method listens for new messages. Update the Interface with fresh messages.
- Implement user authentication:Firebase Authentication lets logged-in users send messages.
- Add user profiles: Build a user profile screen to update name and photo. Save profile photographs in Firebase Storage.
- Add push notifications: Firebase Cloud Messaging lets you notify users of new messages.
The following are the fundamentals for developing a chat app in Flutter using Firebase Realtime Database. Other features, like as group chat, emoji support, and read receipts, can be added to the app at your discretion.
Set up Firebase
Here are the basic steps:
- Go to the Firebase website and sign in with your Google account.
- Click on “Go to console” to create a new Firebase project.
- Click on “Add project” and enter a name for your project.
- Choose your country/region and click on “Create project”.
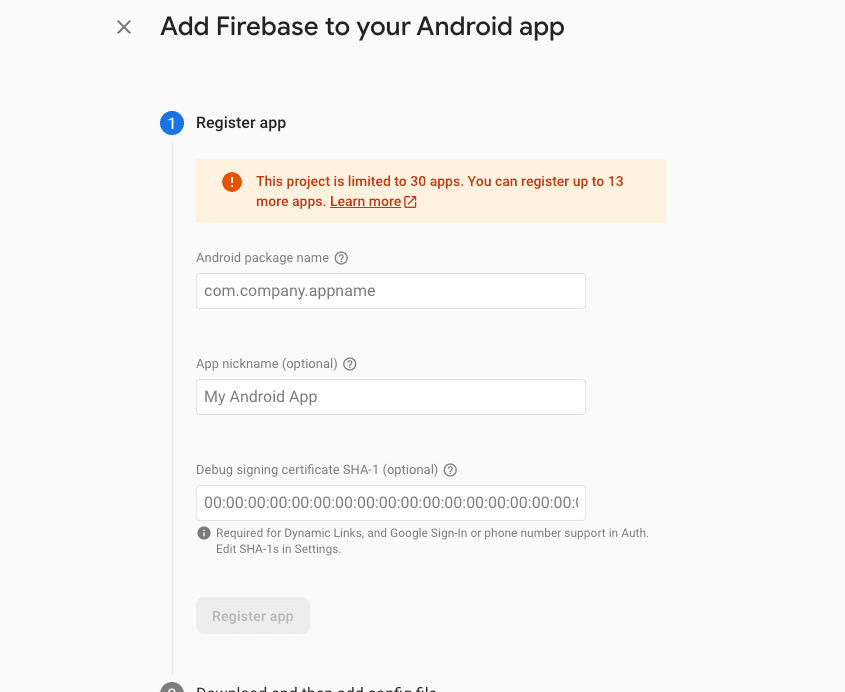
- Once your project is created, click on “Add Firebase to your Flutter app”.
- Enter your app’s package name and click on “Register app”.
- Download the google-services.json file and add it to your Flutter project’s android/app directory.
- Add the Firebase dependencies to your Flutter project’s pubspec.yaml file.
classpath 'com.google.gms:google-services:4.3.10'
- Open the android/app/build.gradle file and add the following line at the bottom:
apply plugin: 'com.google.gms.google-services'
- Finally, run
flutter pub getto install the Firebase dependencies and you’re ready to start using Firebase in your Flutter app.
Note: Firebase and Flutter versions may change these processes. For current and accurate information, consult official documentation.
Create a chat screen
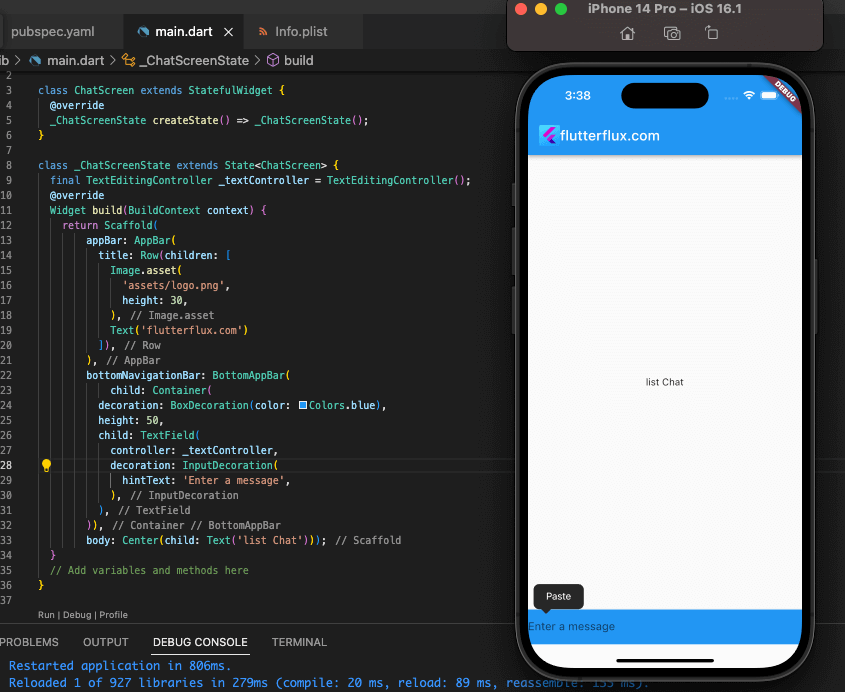
- Create a new StatefulWidget called ChatScreen.
class ChatScreen extends StatefulWidget {
  @override
  _ChatScreenState createState() => _ChatScreenState();
}

class _ChatScreenState extends State<ChatScreen> {
  // Add variables and methods here
}
- Create _textController in the ChatScreen widget to stored as json user input.
final TextEditingController _textController = TextEditingController();
- Display user-sent and received messages in a ListView.
ListView.builder(
  itemCount: _messages.length,
  itemBuilder: (BuildContext context, int index) {
    return Text(_messages[index]);
  },
),
- Add a TextField at the bottom to let users add messages
TextField(
  controller: _textController,
  decoration: InputDecoration(
    hintText: 'Enter a message',
  ),
),
- Add a Button next to the TextField to send the message.
RaisedButton(
  child: Text('Send'),
  onPressed: () {
    _sendMessage(_textController.text);
  },
),
- Add the new message to Firebase Realtime Database and clear the text field with the
_sendMessagemethod.
void _sendMessage(String message) {
  // Get a reference to the Firebase Realtime Database
  DatabaseReference reference =
      FirebaseDatabase.instance.reference().child('messages');

  // Push the new message to the database
  reference.push().set({
    'text': message,
    'sender': FirebaseAuth.instance.currentUser.uid,
    'timestamp': DateTime.now().millisecondsSinceEpoch,
  });

  // Clear the text field
  _textController.clear();
}
- Add a Firebase Realtime to every connected and Database listener to initState to receive new messages.
void initState() {
  super.initState();

  // Get a reference to the Firebase Realtime Database
  DatabaseReference reference =
      FirebaseDatabase.instance.reference().child('messages');

  // Listen for new messages
  reference.onChildAdded.listen((event) {
    setState(() {
      _messages.add(event.snapshot.value['text']);
    });
  });
}
- Test the chat screen after adding the ChatScreen widget to your app’s main widget tree.
void main() {
  runApp(MaterialApp(
    title: 'Flutter Chat App',
    home: ChatScreen(),
  ));
}
Note: A full-featured chat app may have more features than this basic example. The UI and functionality are customizable.
Store messages in Firebase
general idea of how to store messages in Firebase Realtime Database instance in your Flutter app. Here are the basic steps:
- Get a reference to the Firebase Realtime Database.
DatabaseReference reference = FirebaseDatabase.instance.reference().child('messages');
- Create a new Map object to hold the message data.
Map<String, dynamic> messageData = {
  'text': 'Hello, World!',
  'sender': 'user123',
  'timestamp': DateTime.now().millisecondsSinceEpoch,
};
- Push the message data to the Firebase Realtime Database.
reference.push().set(messageData);
- To update a message in the database, get a reference to the message using its key and call update() method.
String messageKey = '-Mj5z0tqjK9N9yf1dNtJ';
reference.child(messageKey).update({
  'text': 'Updated message text',
  'timestamp': DateTime.now().millisecondsSinceEpoch,
});
- To delete a message from the database, get a reference to the message using its key and call remove() method.
String messageKey = '-Mj5z0tqjK9N9yf1dNtJ';
reference.child(messageKey).remove();
Note: These principles may change depending on your chat app’s design and functionality. Add message information and user profiles to the data structure.
Retrieve messages from Firebase
Here are the basic steps:
- Get a reference to the Firebase Realtime Database.
DatabaseReference reference = FirebaseDatabase.instance.reference().child('messages');
- Add a listener to the reference to listen for new messages.
reference.onChildAdded.listen((event) {
  // Get the message data from the snapshot
  Map<String, dynamic> messageData = event.snapshot.value;

  // Add the message to the list of messages
  setState(() {
    _messages.add(messageData);
  });
});
- To retrieve all messages and connected client in the database, use the once() method to get a DataSnapshot of the reference.
reference.once().then((DataSnapshot snapshot) {
  // Loop through the messages and add them to the list
  Map<dynamic, dynamic> messages = snapshot.value;
  messages.forEach((key, value) {
    setState(() {
      _messages.add(value);
    });
  });
});
- To retrieve a specific message from the database, get a reference to the message using its key and add a listener to the reference.
String messageKey = '-Mj5z0tqjK9N9yf1dNtJ';
DatabaseReference messageReference = reference.child(messageKey);
messageReference.onValue.listen((event) {
  // Get the message data from the snapshot
  Map<String, dynamic> messageData = event.snapshot.value;

  // Update the message in the list of messages
  setState(() {
    int index = _messages.indexWhere((m) => m['key'] == messageKey);
    _messages[index] = messageData;
  });
});
Note: Your Flutter chat app design and functionality may change these procedures. Customize the data structure and add message information and user profiles.
Implement user authentication
Firebase Authentication for Flutter app user authentication. Basic steps:
- Set up Firebase Authentication: Follow the instructions to set up Firebase Authentication for your Flutter app.
- Create a login screen with email and password fields and a login button.
class LoginScreen extends StatefulWidget {
  @override
  _LoginScreenState createState() => _LoginScreenState();
}

class _LoginScreenState extends State<LoginScreen> {
  final TextEditingController _emailController = TextEditingController();
  final TextEditingController _passwordController = TextEditingController();

  @override
  Widget build(BuildContext context) {
    return Scaffold(
      appBar: AppBar(
        title: Text('Login'),
      ),
      body: Padding(
        padding: EdgeInsets.all(16.0),
        child: Column(
          mainAxisAlignment: MainAxisAlignment.center,
          children: [
            TextField(
              controller: _emailController,
              decoration: InputDecoration(
                hintText: 'Email',
              ),
            ),
            TextField(
              controller: _passwordController,
              decoration: InputDecoration(
                hintText: 'Password',
              ),
              obscureText: true,
            ),
            RaisedButton(
              child: Text('Login'),
              onPressed: () {
                _login();
              },
            ),
          ],
        ),
      ),
    );
  }

  // Add methods here
}
- Implement the _login method to authenticate the user using Firebase Authentication.
void _login() async {
  try {
    UserCredential userCredential = await FirebaseAuth.instance.signInWithEmailAndPassword(
      email: _emailController.text,
      password: _passwordController.text,
    );
    Navigator.pushReplacementNamed(context, '/home');
  } on FirebaseAuthException catch (e) {
    if (e.code == 'user-not-found') {
      print('No user found for that email.');
    } else if (e.code == 'wrong-password') {
      print('Wrong password provided for that user.');
    }
  }
}
- Create a registration screen with email, password, and confirm password fields and a register button.
class RegistrationScreen extends StatefulWidget {
  @override
  _RegistrationScreenState createState() => _RegistrationScreenState();
}

class _RegistrationScreenState extends State<RegistrationScreen> {
  final TextEditingController _emailController = TextEditingController();
  final TextEditingController _passwordController = TextEditingController();
  final TextEditingController _confirmPasswordController = TextEditingController();

  @override
  Widget build(BuildContext context) {
    return Scaffold(
      appBar: AppBar(
        title: Text('Register'),
      ),
      body: Padding(
        padding: EdgeInsets.all(16.0),
        child: Column(
          mainAxisAlignment: MainAxisAlignment.center,
          children: [
            TextField(
              controller: _emailController,
              decoration: InputDecoration(
                hintText: 'Email',
              ),
            ),
            TextField(
              controller: _passwordController,
              decoration: InputDecoration(
                hintText: 'Password',
              ),
              obscureText: true,
            ),
            TextField(
              controller: _confirmPasswordController,
              decoration: InputDecoration(
                hintText: 'Confirm Password',
              ),
              obscureText: true,
            ),
            RaisedButton(
              child: Text('Register'),
              onPressed: () {
                _register();
              },
            ),
          ],
        ),
      ),
    );
  }

  // Add methods here
}
- Implement the _register method to create a new user account using Firebase Authentication.
void _register() async {
  try {
    UserCredential userCredential = await FirebaseAuth.instance.createUserWithEmailAndPassword(
      email: _emailController.text,
      password: _passwordController.text,
    );
    Navigator.pushReplacementNamed(context, '/home');
  } on FirebaseAuthException catch (e) {
    if (e.code == 'weak-password') {
      print('The password provided is too weak.');
    } else if (e.code == 'email-already-in-use') {
      print('The account already exists for that email.');
    }
  } catch (e) {
    print(e);
  }
}
- Add authentication listeners to your app to redirect the user to the login or registration screen based on their authentication status.
void main() {
  runApp(MaterialApp(
    title: 'Flutter Chat App',
    home: AuthenticationWrapper(),
    routes: {
      '/home': (BuildContext context) => HomeScreen(),
      '/login': (BuildContext context) => LoginScreen(),
      '/register': (BuildContext context) => RegistrationScreen(),
    },
  ));
}

class AuthenticationWrapper extends StatelessWidget {
  @override
  Widget build(BuildContext context) {
    return StreamBuilder(
      stream: FirebaseAuth.instance.authStateChanges(),
      builder: (BuildContext context, AsyncSnapshot<User> snapshot) {
        if (snapshot.connectionState == ConnectionState.waiting) {
          return CircularProgressIndicator();
        } else {
          if (snapshot.hasData) {
            return HomeScreen();
          } else {
            return LoginScreen();
          }
        }
      },
    );
  }
}
Note: Your app’s design and functionality may change these stages. Customize the Interface and add social network and email verification.
Add user profiles
However, I can provide you with a general guideline or a sample code structure that you can modify and customize according to your needs.
- First, create a user model class with the required properties such as name, email, profile picture, etc.
class User {
  String name;
  String email;
  String profilePictureUrl;
  // other properties

  User({required this.name, required this.email, required this.profilePictureUrl});
}
- Create a user profile screen or widget that displays the user’s profile information.
class UserProfileScreen extends StatelessWidget {
  final User user;

  const UserProfileScreen({Key? key, required this.user}) : super(key: key);

  @override
  Widget build(BuildContext context) {
    return Scaffold(
      appBar: AppBar(
        title: Text(user.name),
      ),
      body: Column(
        crossAxisAlignment: CrossAxisAlignment.center,
        children: [
          SizedBox(height: 16),
          CircleAvatar(
            radius: 50,
            backgroundImage: NetworkImage(user.profilePictureUrl),
          ),
          SizedBox(height: 16),
          Text(user.name),
          SizedBox(height: 8),
          Text(user.email),
          // other user profile information
        ],
      ),
    );
  }
}
- Build a screen or widget for user profile editing.
class EditUserProfileScreen extends StatefulWidget {
  final User user;

  const EditUserProfileScreen({Key? key, required this.user}) : super(key: key);

  @override
  _EditUserProfileScreenState createState() => _EditUserProfileScreenState();
}

class _EditUserProfileScreenState extends State<EditUserProfileScreen> {
  late TextEditingController nameController;
  late TextEditingController emailController;
  // other controllers for other user profile information

  @override
  void initState() {
    super.initState();
    nameController = TextEditingController(text: widget.user.name);
    emailController = TextEditingController(text: widget.user.email);
    // initialize other controllers with user profile information
  }

  @override
  Widget build(BuildContext context) {
    return Scaffold(
      appBar: AppBar(
        title: Text('Edit Profile'),
      ),
      body: Column(
        crossAxisAlignment: CrossAxisAlignment.center,
        children: [
          SizedBox(height: 16),
          CircleAvatar(
            radius: 50,
            backgroundImage: NetworkImage(widget.user.profilePictureUrl),
          ),
          SizedBox(height: 16),
          TextField(
            controller: nameController,
            decoration: InputDecoration(
              labelText: 'Name',
            ),
          ),
          SizedBox(height: 8),
          TextField(
            controller: emailController,
            decoration: InputDecoration(
              labelText: 'Email',
            ),
          ),
          // other text fields for other user profile information
          SizedBox(height: 16),
          ElevatedButton(
            onPressed: () {
              // save user profile information and navigate back to user profile screen
              final updatedUser = User(
                name: nameController.text,
                email: emailController.text,
                profilePictureUrl: widget.user.profilePictureUrl,
                // update other user profile information
              );
              Navigator.of(context).pop(updatedUser);
            },
            child: Text('Save'),
          ),
        ],
      ),
    );
  }
}
- Go between user profile and editing screens.
class MyApp extends StatelessWidget {
  @override
  Widget build(BuildContext context) {
    final user = User(
      name: 'John Doe',
      email: '[email protected]',
      profilePictureUrl: 'https://example.com/profile.jpg',
    );
    return MaterialApp(
      title: 'My App',
      home: UserProfileScreen(user: user),
      routes: {
        '/edit-profile': (context) => EditUserProfileScreen(user: user),
      },
    );
  }
}

// in UserProfileScreen widget:

ElevatedButton(
  onPressed: () async {
    final updatedUser = await Navigator.of(context).pushNamed('/edit-profile', arguments: user);
    if (updatedUser != null) {
      setState(() {
        user = updatedUser;
      });
    }
  },
  child: Text('Edit Profile'),
),

// in EditUserProfileScreen widget:

Navigator.of(context).pop(updatedUser);
This Flutter user profile example is basic. Customize the code to include login, user preferences, etc.
Add push notifications
To add push notifications in Flutter, you can follow these general steps
- Create a new project in the Firebase console and add your app to set up Firebase Cloud Messaging (FCM).
- Add the Firebase Core and FCM packages to your pubspec.yaml file:
dependencies:
  firebase_core: ^1.6.0
  firebase_messaging: ^11.2.0
- Initialize Firebase in your app by calling Firebase.initializeApp() in your main() function:
void main() async {
  WidgetsFlutterBinding.ensureInitialized();
  await Firebase.initializeApp();
  runApp(MyApp());
}
- Create a FirebaseMessaging instance and request permission to receive notifications in your app:
FirebaseMessaging messaging = FirebaseMessaging.instance;
NotificationSettings settings = await messaging.requestPermission(
  alert: true,
  badge: true,
  sound: true,
);
- Handle incoming notifications by registering a callback function that will be called when a notification is received while the app is in the foreground:
FirebaseMessaging.onMessage.listen((RemoteMessage message) {
  print('Got a message whilst in the foreground!');
  print('Message data: ${message.data}');

  if (message.notification != null) {
    print('Message also contained a notification: ${message.notification}');
  }
});
- Register a callback function to handle background or terminated notifications:
FirebaseMessaging.onMessageOpenedApp.listen((RemoteMessage message) {
  print('A new onMessageOpenedApp event was published!');
  print('Message data: ${message.data}');

  if (message.notification != null) {
    print('Message also contained a notification: ${message.notification}');
  }
});
- Send a test notification from the Firebase console to verify that your implementation is working correctly.
This simple Flutter push notification example uses Firebase Cloud Messaging. You can modify the code to handle other notifications or use a different push notification service.

